 how-to
How to Learn Basic Motorcycle Maintenance
Table of Contents
- Start With the Tools and a Plan for Learning Motorcycle Maintenance
- Motorcycle T-CLOCS Inspection Checklist: What to Actually Look For
- Motorcycle Chain Cleaning and Lubrication Done Right
- How to Adjust Motorcycle Chain Slack
- Oil Changes, Spark Plugs, and Air Filters: The Routine Jobs
- Shaft Drive Inspection and Service Basics
- Motorcycle Fork Seal Replacement and Fork Oil Change
- Building a Maintenance Schedule That Fits How You Ride
- Frequently Asked Questions
Last Updated: October 21, 2026
Start With the Tools and a Plan for Learning Motorcycle Maintenance
Learning basic motorcycle maintenance starts with a small, honest tool kit and one rule: touch one system at a time until it makes sense.
Here is the starter kit that covers nearly everything in this guide:
- A socket set with a ratchet and extensions
- Combination wrenches in common sizes
- Allen keys, metric and standard
The plan matters as much as the tools. Pick one job, read the manual section twice, then do it slowly. The factory service manual beats any video because it lists exact torque values and fluid amounts.
Motorcycle T-CLOCS Inspection Checklist: What to Actually Look For
The T-CLOCS inspection checklist is a pre-ride walk-around covering tires, controls, lights, oil, chassis, and stands. Riders hear the acronym constantly but rarely hear what to actually look for, or what to do when something looks off.
Here is the real breakdown:
- T - Tires, wheels, and brakes. Check pressure cold with a gauge, not a thumb. Look for tread wear bars showing, cracks in the sidewall, and loose or broken spokes. Spin each wheel and listen for grinding.
- C - Controls. Squeeze the front brake lever and clutch. They should feel firm, not spongy. Twist the throttle and confirm it snaps back on its own. Look for frayed cables and cracked hoses.
- L - Lights and electronics. Hit the high beam, low beam, tail light, brake light, and both signals. Check the horn. A dead brake light is a safety problem, not an annoyance.
What to Do When a T-CLOCS Check Turns Up a Problem
Finding a problem is the point of the check, not a reason to panic. Match the fix to the severity.
- Stop riding now: cracked sidewalls, metal-on-metal brake noise, a throttle that sticks, or a fuel leak. Park it and fix it before the next ride.
- Fix before the next long ride: low tire pressure, a dim bulb, a loose chain, or a spongy lever.
- Note it and watch it: slight tread wear, a small weep around a gasket, or a stand spring that feels a little weak.
Write down what you find. A running log of small issues turns into a maintenance schedule without any extra work.
Motorcycle Chain Cleaning and Lubrication Done Right
Chain care is the highest-return job a rider can learn. A clean, properly lubed chain lasts longer, runs quieter, and protects the sprockets. It also takes about fifteen minutes once the habit sticks.
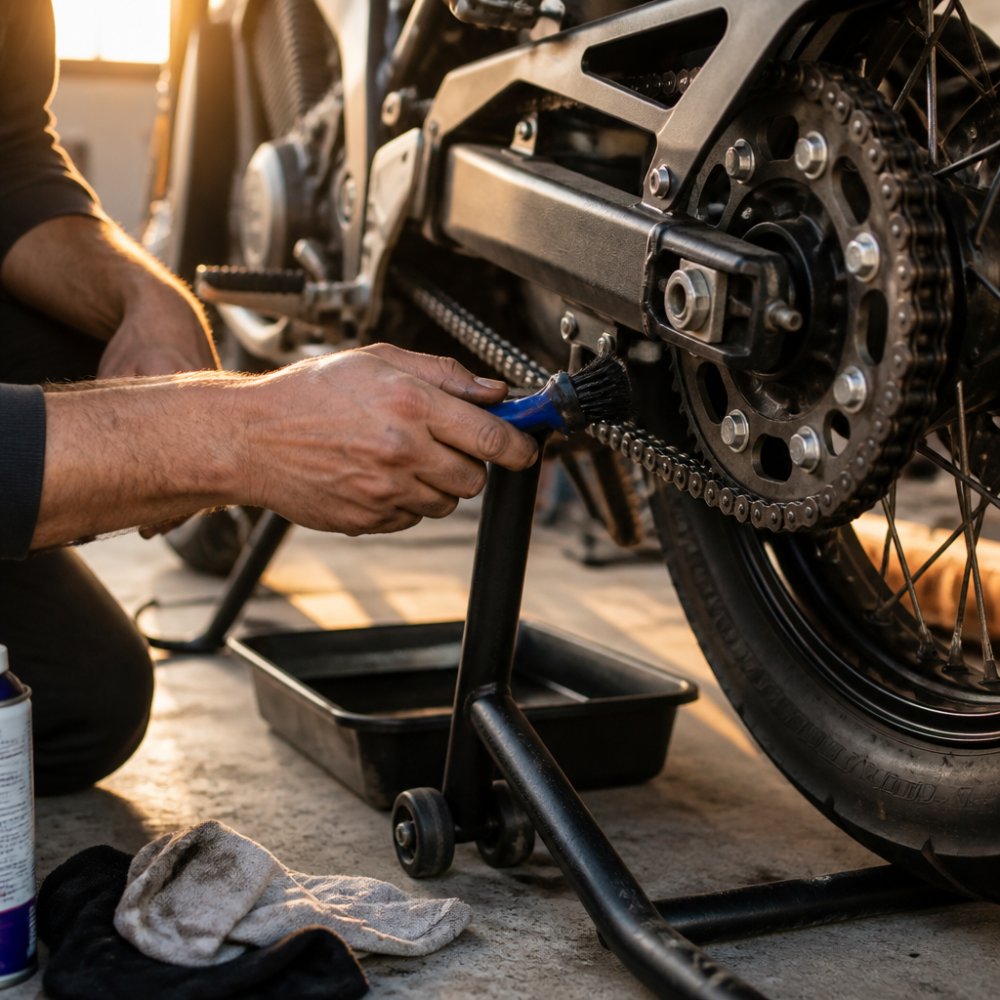
Work through it in this order:
- Put the bike on a rear stand so the wheel spins freely.
- Spray chain cleaner on a rag or brush, not directly blasting the seals.
- Scrub the chain while turning the wheel by hand. Never let the engine spin the wheel.
- Wipe off the grime with a clean rag.
- Let it dry, then apply chain lube to the inside of the chain while spinning the wheel.
- Wipe off the excess so grit does not stick.
Clean and lube every few hundred miles, and always after rain or dust. Too much lube is as bad as too little, excess flings off and collects grit that grinds the chain.
How to Adjust Motorcycle Chain Slack
Adjusting motorcycle chain slack means setting the chain to the free play the manual specifies, usually at the midpoint between the sprockets. Too tight wears bearings; too loose can jump the sprocket.
The process stays the same on most bikes:
- Check slack at the tightest point by rotating the wheel and measuring at several spots.
- Loosen the rear axle nut.
- Turn the adjusters on both sides of the swingarm in equal amounts.
- Recheck slack, then confirm the wheel is straight using the marks on the swingarm.
- Torque the axle nut to the manual spec.
A common mistake is adjusting only one side. That cocks the wheel and chews up the sprocket. Another is skipping the torque wrench and cranking the axle nut by feel.
Oil Changes, Spark Plugs, and Air Filters: The Routine Jobs
Oil changes, spark plugs, and air filters keep an engine healthy. None require a shop, and all reward a slow, clean approach with the manual open on the bench.
Oil and Filter Change, Step by Step
- Warm the engine a couple of minutes, not until the pipes are scorching. Warm oil drains faster and carries more crud out.
- Put the bike on level ground and set a drip pan under the drain plug. Crack the fill cap first so the oil does not glug.
- Remove the drain plug and let it drain fully. Replace the crush washer every time, a reused washer is the number one cause of a slow weep.
- Swap the filter. Smear a little fresh oil on the new filter's rubber gasket so it seats without pinching. Hand-tighten unless the manual says otherwise.
- Reinstall the drain plug and torque it to the manual spec. Snug by feel is how pans get stripped.
- Fill with the manual's amount, run the engine briefly, shut it off, wait a minute, and check the level on level ground. Top off as needed.
What to look for in the old oil: milky or frothy means coolant or water is getting in; gritty oil with a metallic shimmer means something is wearing. A few flecks on the drain plug magnet are normal; a fur coat is not.
Spark Plugs
Pull the plug with a proper plug socket, not a deep well that wobbles. First blow or brush the crud out of the plug well so nothing falls into the cylinder.
Read the old plug's tip:
- Tan or light brown: normal, the engine is happy.
- Black and sooty: rich mixture, a dirty air filter, or a lot of short cold-start trips.
- White, blistered, or melted: running hot, lean mixture or the wrong heat range.
Gap the new plug to spec, thread it in by hand until it seats, then torque it. Overtightening crushes the crush washer and can strip aluminum threads, an expensive lesson.
Air Filters
A clogged filter chokes the engine, hurts fuel mileage, and fouls plugs. It is the easiest win in the routine.
- Paper element: tap it out gently, hold it up to a light, and replace it if you cannot see daylight through it. Do not wash paper filters.
- Foam element: wash it in the cleaner the manual calls for, let it dry fully, then oil it lightly. Too much oil pulls dirt into the intake.
- Cotton gauze (reusable): clean and re-oil per the maker's kit. Over-oiling is the common mistake.
While the filter is out, wipe the airbox clean and check the intake boot is seated and not cracked. A cracked boot lets unfiltered air in and undoes the whole job.
Shaft Drive Inspection and Service Basics
Shaft drive inspection is simpler than chain care, but not maintenance-free. Shaft bikes skip the chain lube, yet the final drive still needs attention, and because it is sealed up, problems hide until they are expensive.
What to Check and How Often
- Final drive gear oil: check the level at the manual's interval and change it on schedule. Most shaft bikes want it changed more often than riders think, especially after rain or dusty riding.
- Seals and the boot: look for weeping oil around the final drive housing, input seal, and swingarm boot. A light film is one thing; a drip that leaves a spot on the floor is a leak.
- Splines: grease the shaft splines when the manual calls for it. Dry splines wear and eventually strip, a repair that costs far more than a tube of grease.
Checking and Changing Final Drive Oil
- Support the bike so the rear wheel is off the ground and the final drive is level.
- Clean around the fill and drain plugs so grit does not drop in.
- To check the level, remove the fill plug. Oil should sit right at the bottom of the fill hole, if it dribbles out, it is full; if you cannot feel it, it is low.
- To change it, put a pan under the drain plug, drain fully, and replace the crush washer.
- Reinstall the drain plug and torque to spec. Fill with the exact fluid the manual specifies, shaft drives are picky about gear oil.
- Reinstall the fill plug, take a short ride, and check for leaks.
What to Do When Something Looks Wrong
- Oil weeping at a seal: clean it off and check again after a ride. A persistent weep means the seal is on its way out, plan the replacement.
- Metal shavings or a silvery sheen in the drained oil: stop and have it looked at. That is internal wear, not a fluid problem.
- Whining or grinding from the rear: do not keep riding. A failing final drive can lock the rear wheel.
A common mistake is assuming a shaft drive needs nothing. Riders who ignore the final drive oil end up with a noisy, expensive repair. Riders Helping Riders means passing along the small habits that keep a bike out of the shop, and a shaft bike that gets its fluid and spline attention on schedule will outlast the rider who never looks.
Motorcycle Fork Seal Replacement and Fork Oil Change
Fork seal replacement and a fork oil change are the jobs most riders avoid until the forks leak badly. A weeping seal shows up as an oily ring on the fork tube.
The job is doable at home with the manual and the right tools:
- Support the bike so the front wheel is off the ground.
- Remove the front wheel and brake caliper, then slide the fork legs out.
- Open the fork cap, drain the old oil, and pump the damper to clear it.
- Pry out the old seal and press in the new one with a seal driver.
- Refill with the specified fork oil to the correct level.
- Reassemble and torque everything to spec.
Some forks need a special tool for the damper rod. Check before starting. A common mistake is mixing fork oil weights or overfilling, which makes the front end harsh.
Building a Maintenance Schedule That Fits How You Ride
A maintenance schedule should match how the bike is actually used, not a generic chart.
Riding Pattern | Chain and Tires | Oil Change | |
|---|---|---|---|
Daily commuter | Check weekly, lube monthly | Per manual mileage | Keep on a maintainer if parked often |
Weekend rider | Check before each ride | Per manual or yearly | Maintainer between rides |
Long-term storage | Clean and lube before parking | Change before storage | Maintainer or disconnect |
Cold weather and long storage are where batteries and chains suffer most. A maintainer keeps the charge up during inactivity, and a full charge before parking fights self-discharge.
Learning motorcycle maintenance is less about skill and more about showing up. The chain, the fluids, the forks, and the battery all reward a little regular attention.
Frequently Asked Questions
How do you start learning basic motorcycle maintenance?
Pick one job and learn it fully before moving on. Chain cleaning and lubrication is the best first job because it needs cheap tools, it teaches you how to inspect the bike, and you see the result immediately. From there, move to oil changes, then spark plugs and air filters. Read your owner's manual for the specs, work on a cool bike in a well-lit space, and keep a notebook of what you did and when. Learning motorcycle maintenance is repetition, not theory.
How often should you clean and lube a motorcycle chain?
Clean and lubricate the chain every 300 to 600 miles, and always right after riding in rain or on dusty roads. Short city hops and wet weather wear a chain faster than highway miles, so check it more often in those conditions. Clean with a chain-safe cleaner and a stiff brush, let it dry, then apply lubricant to the inside of the chain while spinning the wheel. Wipe off the excess so it does not fling onto the tire.
How do you check and adjust motorcycle chain slack?
Put the bike on its side stand or center stand per your manual, then push the chain up and down at the midpoint between the front and rear sprockets. Measure that movement against the slack range in your owner's manual. If it is off, loosen the rear axle nut, turn the adjusters on both sides equally, and keep the wheel aligned using the marks on the swingarm. Tighten the axle to spec and recheck the slack before you ride.
What should you do if you find a problem during a motorcycle inspection?
Write it down and sort it by severity. A burned-out turn signal or low tire pressure gets fixed before the next ride. A leaking fork seal, a cracked hose, or a chain with tight spots means the bike stays parked until it is repaired. If you are not sure whether something is safe, ask someone experienced or a shop to look at it. Never talk yourself into riding a bike you know has a problem.